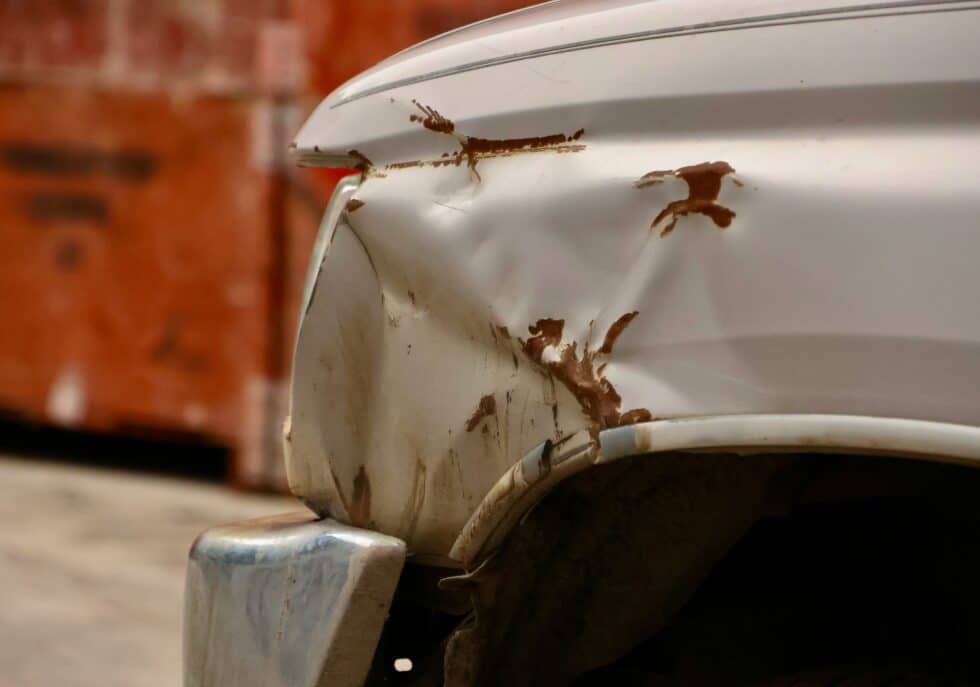
A single bubble in your fender paint isn’t a cosmetic flaw, it’s a distress signal. Beneath that innocent blister, a chemical reaction is quietly eating the equity out of your vehicle. Wait a month, and the bubble expands. Wait a winter, and you’re looking at a hole that threatens the structural rigidity of your car.
This guide walks you through the exact process used by industry veterans to diagnose corrosion severity, select the right industrial-grade abrasives, and execute a repair that stops the spread. We specifically address the harsh realities of Oklahoma City driving, where humidity and road brine conspire to oxidize steel, and define exactly when a repair moves beyond the scope of a home garage and requires a professional welder.
Essential Findings
- Oxidation is a continuous chemical process that only stops when you physically remove the infection or chemically alter the metal.
- Confusing deep “scale rust” with light “surface rust” guarantees your repair will fail within months.
- The longevity of your fix relies entirely on degreasing and sanding, not on the spray paint.
- Grinding steel and spraying solvents releases toxic particulates, NIOSH-approved respirators are mandatory, not optional.
- If corrosion attacks the frame rails or unibody, you must seek professional welding to maintain crash safety compliance.
Professional Guide to Repairing Car Rust Patches and Restoring Vehicle Integrity
Rust is simply iron returning to its natural state. When steel meets oxygen and moisture, it surrenders electrons and becomes iron oxide. Your vehicle acts as a massive anode in this electrochemical exchange. In Oklahoma City, this process is aggressive. The fluctuating humidity and the brine solutions used to treat icy roads act as electrolytes, speeding up the electron flow and accelerating the rot.
Data from the AAA indicates that American drivers spend approximately $3 billion annually on rust repairs. Syed Brothers Auto Body Shop OKC notes that catching corrosion early preserves the panel. Once the oxidation perforates the metal, you are no longer fixing a cosmetic issue, you are replacing structural steel.
Identifying the Three Stages of Automotive Corrosion Before You Start
You cannot fix what you do not understand. The repair method for a surface scratch differs entirely from the surgery required for a rot hole. Assess the damage honestly.
Stage 1: Surface Rust
This is the entry level of corrosion. It manifests as small reddish-brown stains or tiny bubbles where a stone chip or scratch breached the clear coat and primer. The oxidation sits on top of the metal panel like a skin. The steel beneath is still sound, thick, and structural. You can usually sand this away easily.
Stage 2: Scale Rust
If surface rust is ignored, the chemical reaction digs deeper. The metal surface pits and corrodes, creating a rough, flaky texture similar to a scab. The rust has begun to eat into the steel’s gauge, reducing its thickness. You will need a wire wheel or a grinding disc to get down to the “pitted” but solid metal underneath.
Stage 3: Penetrating Rust
This is the terminal stage for the panel section. The iron oxide has consumed the steel entirely, creating holes. Sometimes these holes are hidden under bubbled paint, poke them with a screwdriver, and the metal crumbles. The National Highway Traffic Safety Administration (NHTSA) flags this as a safety risk, especially if found on suspension points or frame rails. You cannot fill these holes with putty, you must cut out the bad metal and weld in new steel.
Essential Equipment and Safety Gear for DIY Rust Remediation
You cannot perform surgery with kitchen utensils, and you cannot fix rust with generic hardware store supplies. Syed Brothers Auto Body Shop OKC advises using specific automotive-grade materials to ensure the repair lasts longer than a few weeks.
Personal Protective Equipment (PPE)
- Safety Goggles: High-speed grinders throw metal shards that can embed in your cornea. Wraparound protection is required.
- Nitrile Gloves: Protects your skin from absorbing isocyanates in hardeners and solvents in degreasers.
- Respirator Mask: Paper dust masks fail here. You need a half-face respirator with P100 filters to block metal dust and organic vapor cartridges to filter paint fumes, meeting OSHA standards.
Abrasives
- 80-Grit Sandpaper: The heavy lifter. Use this to strip old paint and grind down the bulk of the rust.
- 180-Grit Sandpaper: The shaper. Use this to smooth out the body filler and feather the edges of the paint.
- 320/400-Grit Sandpaper: The finisher. Use this to remove deep scratches before applying primer.
- Wire Brush/Grinder: An angle grinder with a flap disc or a drill-mounted wire wheel is the only way to mechanically scour scale rust from deep pits.
Chemical Treatments
- Wax and Grease Remover: You must remove road tar, wax, and oils before sanding. If you sand over grease, you drive it into the metal pores, causing fisheyes in your paint later.
- Rust Converter: A chemical agent (usually tannic or phosphoric acid) that turns iron oxide into a stable, black protective coating called iron phosphate.
Fillers and Primers
- Automotive Body Filler (Bondo): A two-part polyester resin used to replace the metal volume lost to grinding.
- Glazing Putty: A thinner, finer filler used to fill microscopic pinholes in the Bondo.
- Self-Etching Primer: An acid-rich primer that bites into bare metal for maximum adhesion.
- High-Build Filler Primer: A thick surfacing primer that fills 180-grit sanding scratches.
Finishing
- Color-Matched Spray Paint: Generic colors will not match. Order paint mixed specifically for your car’s factory code.
- 2K Clear Coat: The standard aerosol clear coat is weak. A 2K (two-component) clear coat has a hardener canister inside that activates before spraying, providing fuel and UV resistance.

Step-by-Step Instructions to Fix a Car Rust Patch and Blend Paint Like a Pro
The difference between a repair that lasts five years and one that bubbles in five weeks is surface preparation.
Phase One: Surface Preparation and Metal Exposure
Wash the area with dish soap (to strip wax) and water. Dry it thoroughly. Tape off a generous perimeter, at least 12 inches, around the damage to protect the rest of the car.
- The Grind: Use your grinder or 80-grit sandpaper to remove the rust. Be aggressive. You must remove the visible rust and the “spider veins” spreading under the paint.
- Pro Tip: Grind until you see bright, shiny silver steel. If you see dark grey spots, that is still rust. Keep grinding.
Phase Two: Neutralizing Microscopic Corrosion with Rust Converters
Even after grinding, microscopic rust often lingers in the pores of the steel.
- Feathering: Use 180-grit paper to smooth the “step” where the bare metal meets the paint. You want a smooth ramp, not a cliff.
- Conversion: Wipe the bare metal with wax and grease remover. Apply the rust converter to any pitted areas. Let it cure for the time specified on the bottle (usually 12-24 hours). It will turn black. This creates a neutral surface for the filler.
Phase Three: Filling Pits and Sculpting Body Contours
Grinding removes metal, leaving a depression. You need to build the surface back up.
- Mixing: Mix the body filler with the hardener cream. You have about 5 minutes of working time.
- Application: Press the filler firmly into the repair area to squeeze out air pockets. Build it slightly higher than the surrounding panel.
- Sanding: Once it hardens (tap it with a fingernail to check), block sand it with 80-grit to get the general shape, then 180-grit to smooth it.
- Glazing: If you see tiny holes, swipe a thin layer of glazing putty over the filler and sand smooth with 320-grit.
Phase Four: Professional Painting and Clear Coat Application Techniques
Paint reveals every imperfection. If the surface isn’t smooth now, paint won’t fix it.
- Priming: Spray 2 light coats of self-etching primer on any bare metal. Follow with 3 coats of high-build primer. Let it dry, then wet sand with 400-grit paper until it feels like smooth glass.
- Base Coat: Shake your color-match can for a full minute. Spray 3-4 light coats, waiting 10 minutes between each. Do not try to get full color coverage on the first pass.
- Clear Coat: Apply 2-3 coats of 2K clear coat. Extend this slightly past your color line to blend it.
Optional: After 48 hours, you can wet sand the clear coat with 2000-grit paper and buff it with compound to make the repair invisible.
Recognizing When Structural Rust Damage Requires a Professional Body Shop in OKC
DIY repairs are excellent for cosmetic skins (fenders, door exteriors). They are dangerous for structural components. Syed Brothers Auto Body Shop OKC handles the heavy lifting when safety is at risk.
Professional repair involves cutting out large sections of steel and welding in new panels. While a DIY kit costs $100, professional metalwork reflects the labor intensity and equipment required.
Go to a pro if:
- Large Perforations: If the hole is larger than a tennis ball, fiberglass mesh and Bondo will eventually crack and fail.
- Structural Components: Never use body filler on frame rails, rocker panels, or pillars. These parts manage crash energy. Filling them with putty destroys the car’s crashworthiness.
- Extensive Spread: If the rust spans a body line or complex curve, recreating that shape requires professional metal fabrication tools.
- Asset Value: If you plan to sell the car for a premium price, a visible DIY repair will lower the value more than the cost of a professional fix.
Long-Term Rust Prevention Strategies to Protect Your Automotive Investment
The cheapest repair is the one you never have to make.
- Routine Washing: Salt is hygroscopic, it attracts water. Rinse your undercarriage weekly during winter to flush out salt traps.
- Protective Wax: A layer of carnauba or ceramic wax acts as a sacrificial shield, taking the abuse so your clear coat doesn’t have to.
- Immediate Touch-ups: Keep a $20 paint pen in your glovebox. If a rock chips your paint, seal it that same day.
- Undercoating: In Oklahoma, oil-based fluid film undercoatings are superior to rubberized sprays. Oil creeps into seams and displaces moisture, whereas rubberized coatings can trap salt water against the frame if they chip.
Rust is a time-sensitive infection. Neglecting a small spot today leads to panel replacement tomorrow. Whether you tackle this project in your driveway with the steps outlined above or hand the keys to a professional, immediate action is the only way to protect your investment. For drivers in Oklahoma City facing deep corrosion, hail damage, or structural concerns that exceed DIY capabilities, Syed Brothers Auto Body Shop OKC provides the industrial expertise and certified welding required to return your vehicle to factory safety standards. Contact us today to evaluate your vehicle and stop the spread before it’s too late.
Frequently Asked Questions
Can I Just Paint Directly Over Rust?
No. Painting over rust is purely cosmetic camouflage that accelerates the damage. Rust is hydrated iron oxide, it contains moisture within its chemical structure. According to Corrosionpedia, applying a non-porous paint layer over rust traps this moisture and oxygen against the metal, creating a "greenhouse effect" that speeds up the oxidation process.
You must mechanically remove the rust or chemically convert it before priming.
How Much Does A DIY Rust Repair Cost Compared To A Professional Shop?
DIY repairs are significantly cheaper upfront but carry a risk of lower durability. A comprehensive DIY kit (sandpaper, filler, primer, paint, clear coat, respirator) typically costs between $100 and $200. Professional repair for a single rusted panel often starts at $500 and can exceed $2,000 if welding is required, primarily due to labor rates, which Consumer Reports estimates average over $100/hour.
Use DIY methods for older daily drivers where cosmetic perfection isn't critical.
How Long Will A DIY Rust Repair Last If I Do It Myself?
Expect a lifespan of 1 to 3 years for a standard DIY repair, compared to the lifetime of the vehicle for professional work. Most DIYers use 1K (single-component) aerosol cans. Paint & Coatings Industry Magazine notes that 1K products lack the cross-linking hardeners found in professional 2K systems, making them less resistant to UV rays, solvents, and road salts.
To extend the life of a DIY repair, upgrade to 2K aerosol primers and clear coats (cans with a plunger at the bottom). Preparation quality is the single biggest variable, leaving even a speck of rust ensures recurrence.
What Is The Difference Between A Rust Converter And A Rust Remover?
Removers strip the metal bare, converters turn the rust into a primer-ready coating. Rust removers use strong acids (hydrochloric or phosphoric) to dissolve iron oxide, leaving clean steel that flashes over quickly. Rust converters use tannic acid polymers to react with the rust, turning it into iron tannate or phosphate, a stable black layer. The Journal of Protective Coatings & Linings confirms that converters are best for areas where complete mechanical removal is impossible.
Use removers or grinding for exterior body panels where you need a smooth surface. Use converters for frames, undercarriages, or floor pans where the black finish will be covered by carpet or undercoating.
How Do I Find The Correct Paint Code For My Car?
You need the specific alphanumeric code from the manufacturer, not just the color name. Car manufacturers produce dozens of variations of "white" or "silver." The code is located on the Service Parts Identification (SPID) label, commonly found on the driver’s door jamb, glove box, or spare tire well.
Take a photo of the sticker. Enter the code into an automotive touch-up paint database or give it to the supply shop. A visual match is impossible, the chemical formula must match.
Is A Rust Converter Better Than A Primer For Bare Metal?
No. Rust converter requires rust to activate, it will not bond properly to clean steel. Technical Data Sheets (TDS) for products like Corroseal or Loctite Extend emphasize that the chemical reaction requires iron oxide. On bare shiny metal, the converter acts as a weak barrier that can peel. 3M Automotive Division recommends a self-etching primer for bare metal adhesion.
If you have ground the metal 100% clean, use a self-etching primer. If you have deep pits with residual rust you can't reach, use a converter first, then primer.
What Happens If I Don't Remove All The Rust Before Applying Bondo?
The repair will fail rapidly as the rust spreads underneath the filler. Standard polyester body filler is hygroscopic (absorbs moisture). If applied over active rust, the oxidation continues, releasing gases and expanding. Evercoat, a leading filler manufacturer, states that this expansion pushes the filler away from the metal, causing bubbling and delamination.
Treat the metal first. Ideally, apply a layer of epoxy primer over the metal before applying filler to seal the steel, or ensure every speck of rust is ground away before filling.
How Long Should I Wait Between Coats Of Spray Paint?
Follow the "flash time" on the can, usually 10-15 minutes. Solvents must evaporate (flash off) before you seal them with another coat. Axalta Coating Systems warns that "solvent pop", tiny pinholes in the finish, occurs when wet layers are stacked too quickly, trapping gas bubbles that eventually burst through the surface.
Touch the tape next to your repair. If the paint is tacky but doesn't transfer to your finger, it is ready for the next coat. Wait longer in cold or humid weather.
Can A Car Fail Inspection Because Of Rust?
Yes, if the rust compromises structural integrity or creates sharp edges. While Oklahoma does not have mandatory annual safety inspections, states that do (like Texas or Missouri) follow Federal Motor Carrier Safety Administration guidelines. These state that holes in the floor pan (exhaust fume risk) or frame damage are automatic failures.
Even without inspections, jagged rust holes are a liability. If a pedestrian is cut by your rusted fender, you could be liable. Repair sharp edges immediately.
Is It Worth Fixing Rust On A Car With Over 200,000 Miles?
It depends on the drivetrain health versus the repair cost. Kelley Blue Book valuation models show that visible rust degrades condition ratings to "Fair" or "Poor," dropping value by 20-40%. However, spending $3,000 to fix a car worth $2,500 is negative equity.
For high-mileage cars, use the "stop-gap" method. Grind and seal the rust to prevent safety issues, but skip the expensive professional blending. Use DIY methods to keep the car roadworthy until the engine fails.
What Are The Signs That Rust Has Become Structural?
Holes in the frame, rocker panels, or suspension mounts. Structural rust often affects the unibody's "crumple zones." I-CAR (Inter-Industry Conference on Auto Collision Repair) identifies the rocker panels and pillars as critical load-bearing structures. If these are perforated, the car may collapse abnormally in a collision.
Put the car on a lift. Tap the frame rails with a hammer. A solid "clang" is good, a dull thud or a crunch indicates internal rot. If you see daylight through the frame, the vehicle is unsafe.
How Do I Prevent Rust From Coming Back After A Repair?
You must seal both sides of the panel. Rust often starts from the inside of the panel due to condensation or clogged drain holes. Por-15 technical articles explain that repairing the outside paint does nothing to stop moisture from attacking from the rear.
After painting the exterior, spray an oil-based cavity wax or undercoating into the inside of the door or fender. Keep drain holes at the bottom of doors clear of debris.
Does Road Salt Really Make My Car Rust 50 Percent Faster?
Yes, salt accelerates the electrochemical reaction drastically. A study by the Transportation Research Board found that de-icing salts reduce the electrical resistance of water, allowing the corrosion current to flow much faster. Vehicles in the "Salt Belt" have a median lifespan significantly shorter than those in the South due to this factor.
If you drive in OKC during winter storms, you must wash the undercarriage immediately after the roads dry. Leaving salt crust on the frame for weeks guarantees accelerated rot.
Should I Use A Grinder Or Sandpaper For Rust Removal?
Use a grinder for speed and depth, use sandpaper for finesse. An angle grinder with a flap disc removes material at 10,000+ RPM. It generates heat and removes metal rapidly. Norton Abrasives suggests using grinders for stripping to bare metal, but switching to hand sanding or DA sanders to feather edges, as grinders leave deep gouges that show through paint.
Start with the grinder to remove the "cancer." Switch to 80-grit hand sanding to shape the metal, then finer grits to prep for paint. Never use a grinder for the final finish.